Journals3
Newest
XPS ASCII Editor v1.9 [Tool]
19 min read
XPS ASCII Editor v1.9
This tool edits XNALara/XPS model files of ".ascii" format. It has a lame name, but I think it will do.I originally created it to help me edit the model files, because I need to edit every model I port.. extensively... I thought I should share this tool in case someone needs it.
If you find any bug/error, please notify me.

Requirements:
- For Windows 8 and 10 users: nothing is needed. It should work right away.
- For Windows 7 and Vista: you need to install Microsoft .NET Framework 4.5
WARNING: This tool doesn't support the old meshes format, which only has the mesh name. The tool requires at least the render group and the name in order to load the mesh.
Download link is down below.
How to use:
- First, open the ascii file you want to edit. The tool needs some time to load the model, it could take up to a minute depending on the file size, number of UV layers, etc.. but in average, it should take about 30 seconds (at least for most models I tested).- When the model loads, there are a lot of things you can do. I split the user interface into 2 tabs:
1. Bones:
This wasn't really my main concern. Because of this and my lack of knowledge about bone data in XPS (just being honest!), there are not many things to do here.
(Image from v1.8)
You can rename bones and edit their data directly in the corresponding text box if you know what you are doing. You should click "Save changes" button before you select another bone or your changes won't be saved (obviously!).
If you hide/unhide a bone using the button or use the rename button, you don't need to click "Save changes" button.
It is also worth noting that any changes you make won't be saved to the ascii file until you save the file yourself from File -> Save As (Ctrl+S).
Update: A "Rename" button was added in v1.1 so you can select and rename multiple bones at once. You can also hide/unhide multiple bone at once too.
Update 2: "Convert" button was added in v1.2 which allows you to rename all bones or selected bones based on a template. It is the same idea as my other tool; "XPS pose converter". It uses the same template format. You can also use XPS's BoneDict.txt templates (supported in v1.7 and above).
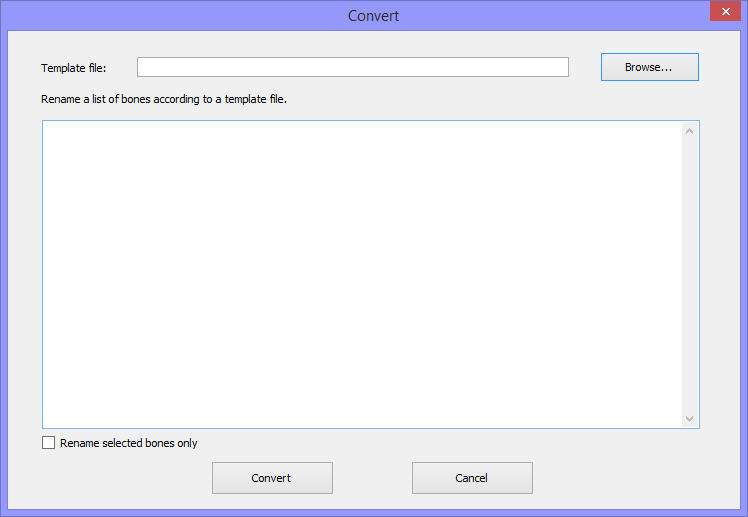
Update 3: "Template editor" was added in v1.6 which helps you create or edit templates for renaming bones (read above). You don't need to load a model file in order to use the template editor. You can type the bone names and their renames directly or load a model file and use the bone list to create the template.
You can also open an existing template and edit it, add items to it or remove items from it.
Starting from v1.7, the "Template editor" supports XPS's templates (BoneDict).
- To add a new line to the template, type the bone name which the template will look for, then the name to which this bone will be renamed, then click "Add" button.
- To edit an existing item in the template, select it from the list on the right, then click "Edit". Now make your changes in "Bone name" and "Rename to" text boxes then click "Save" button (it's the same "Add" button). If you wish to cancel, simply click "Edit" button once again or select a bone from bones list; or another template item from the template list on the right.
- Make sure you save your template before you close the template editor. To save it, go to "File" menu -> "Save As". You can save the template file in either "XPS ascii editor" template format or XPS template format (select from the "Save as type" drop down menu in the save dialog box).
To use the template to rename bones, use "Convert" function as mentioned above ("Bones" tab -> "Convert").
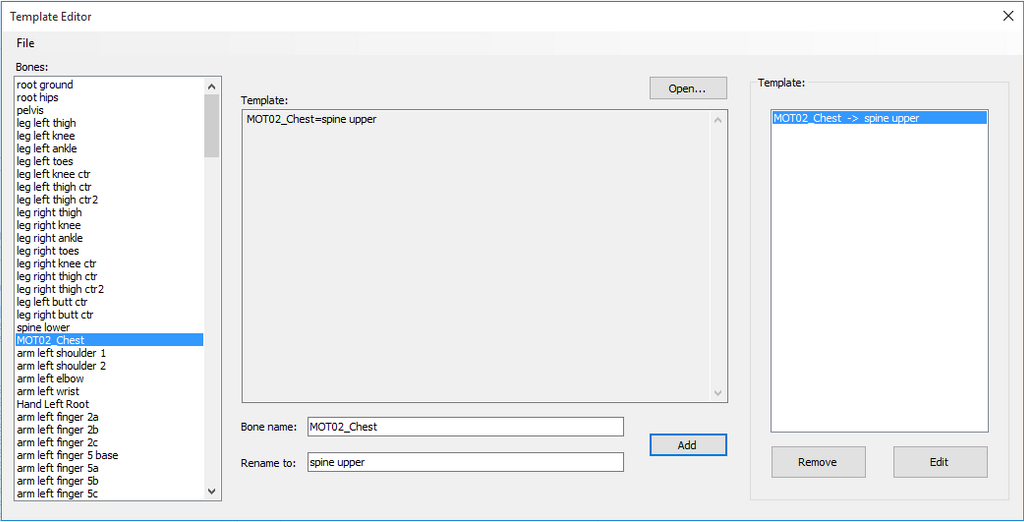
(Image from v1.6)
Update 4: "Parenting bones" was added in v1.8 where you can select a bone or a number of bones and link them to another bone. Simply select the bone(s) from the list on the left then select the bone to which this/these bone(s) will be linked and press "Link" button.
Warning: changing hierarchy may cause unwanted results, so use this function with care.
2. Meshes:
This is where most of the functions of the tool are. You can do a lot of things.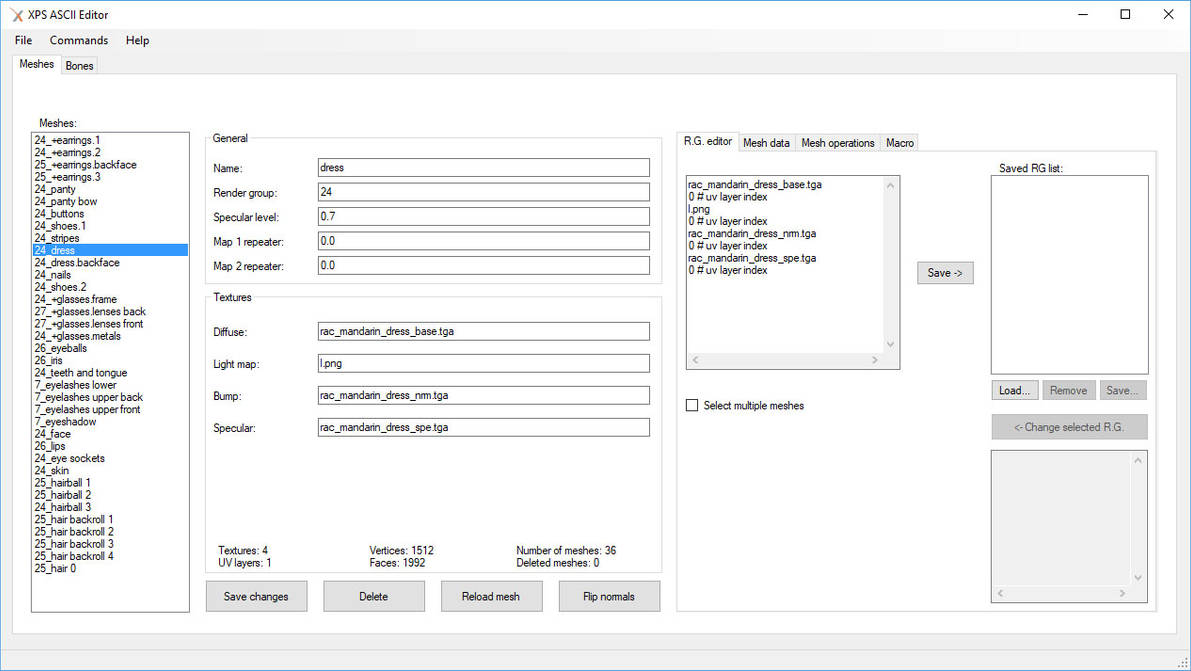
(Image from v1.9)
- General:
Here you can change the selected mesh name, render group, specular level and bump map 1 & 2 repeater.
To change the render group of the selected mesh, simply type the number of the new render group in the related box. The texture types and order in the new group will be automatically set under "Textures" below.
You must click "Save changes" button before you select another mesh or your changes won't be saved.
Note: Of course you can rename several meshes at once, set the specular levels of several meshes at once and also change the render groups of several meshes at once. To do this, please refer to the "R.G. Editor" section for explanation.
- Textures
Here you can edit the textures of the selected render group. It is self explanatory.
You should also click "Save changes" button when you are done.
Note: You can edit the render group of the selected mesh directly in the text box under "R.G. Editor".
- "Delete" button:
This will delete the selected mesh. This is irreversible.
- "Reload mesh" button:
This will reload all the data of the selected mesh. To be more precise, it will load the last saved data of the selected mesh. For example, if you are not happy with the changes you made to the selected mesh, you can reload its original data by clicking this button (unless you already saved them using "Save changes" button). Also, if you make some changes, save them, then make more changes but you aren't happy with the new unsaved changes, use this button and it will load the latest saved changes.
- "Flip normals" button:
It flips the normals of the selected mesh, It autosaves the change to the normals only, so if you make other changes to the mesh, you need to press "Save changes" button. (Available in v1.3 and above)
- R.G. Editor:
This is short for "Render group editor"
You can edit the render group textures of the selected mesh directly by editing the text box on the top left. It is the only editable text box under this tab.
You can save the render group (number & textures) of the selected mesh to the "Saved RG list" so you can change the render group of other mesh(es) later with a single click.
To save the current RG to the list, simply click "Save ->" button. You will be prompted to select a name for the RG to be displayed in the list. The list displays the RG number and name.
You can save the list to a text file to be used later on. To save the current list, use "Save" button below it.
To load a previously saved list, click "Load" button and browse for the list file.
To remove an item from the list, select it and click "Remove" button.
If you select a RG from the list, a preview of this RG will be displayed in the box below "Change selected R.G." button.
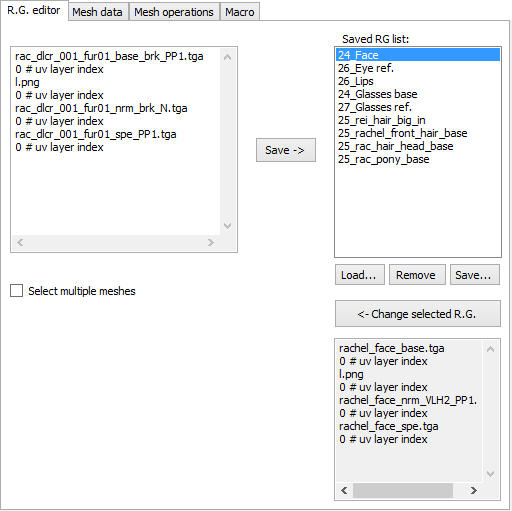
To change the RG of the selected mesh with one of the saved RGs, simply select the desired RG from the list then click "Change selected R.G." button. You don't need to click "Save changes" button after this operation because they will be saved automatically.
Changing properties of several meshes at once:
1. To change the RG of several meshes at once, check "Select multiple meshes" box. A new mesh list will appear. Select the meshes you want to change their RG, select the RG you want to use from the "Saved RG list" then click "Change selected R.G." button. See the image below:
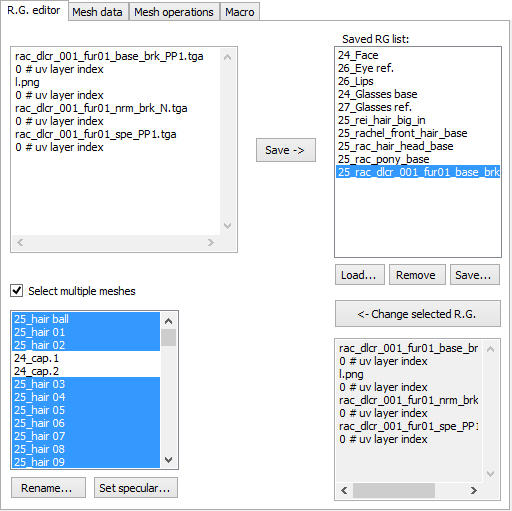
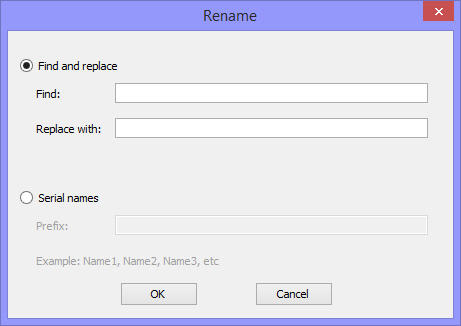
2. You can rename several meshes as well, either by replacing a specific part of the name or by using serial names (for example: Mesh 01, Mesh 02, etc).
With "Select multiple meshes" box selected, select the meshes you want to rename (as in the picture above) and click "Rename" button. This is the rename dialog box, I think it is self explanatory:
3. Finally, you can also set the specular levels of several selected meshes. To do so, select the meshes from the list (as above) and click "Set specular" button, enter the value, then click OK.
- Mesh data:
This tab only displays the vertices and faces data of the selected mesh. You can edit them directly from the related text box if you know what you are doing. Changes will be saved when you click "Save changes" button or when you do one of the operations that autosave the data (such as changing RG of several meshes).
- Mesh operations:
Here you can copy/paste a mesh or several meshes within the same model or among several models.
-"Copy" button saves the selected mesh to the "Saved meshes" list.
-"Paste selected" button pastes the selected saved mesh from the list to the current model.
-"Paste all" button pastes all saved meshes (in the list) to the current model.
-"Remove mesh" button removes the selected mesh from the "Saved meshes" list. It doesn't delete any meshes from the model. To delete a mesh from the model, use "Delete" button below "Textures" like I said before.
-"Clear list" button: well, I don't think I need to say anything here.
Example: You can use these functions to copy a mesh or several meshes from one model to another model. To do so, open a model, select the mesh you want to copy, go to "Mesh operations" tab and click "Copy" button. You can repeat this to copy several other meshes to this list.
Now open the model you want to copy these meshes to, go to "Mesh operations" tab and paste the mesh(es).
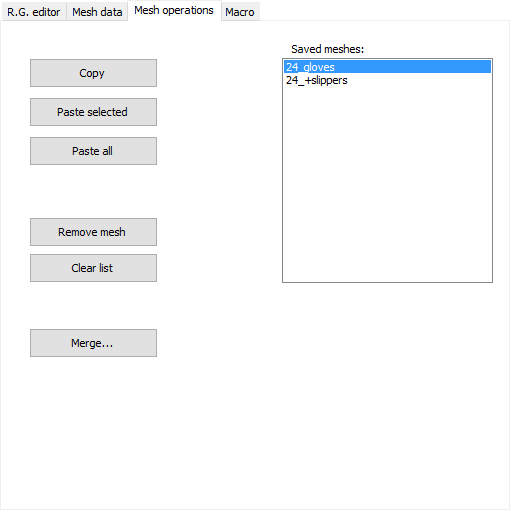
(Image from v1.5)
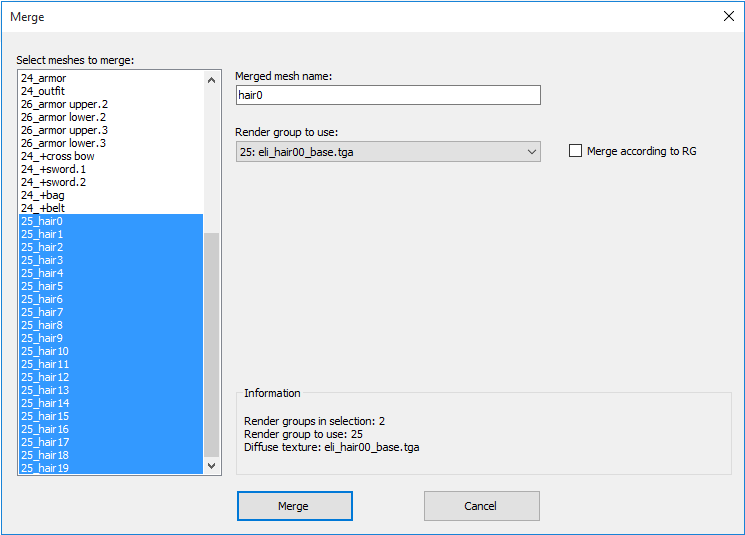
-"Merge" button: Merge function allows you to merge (combine) several meshes into one mesh only.
You can assign only one render group to the new mesh (obviously). The tool shows you the render group(s) the selected meshes use and lets you choose one to apply to the new mesh.
You can also use the option "Merge according to RG" which combines the meshes from selection which share the same RG (render group). For example, if you select 10 meshes, 3 of which use render group A, and the other 7 use render group B, you will get 2 meshes; the first of them (a combination of the 3 meshes) uses render group A while the second (a combination of 7 meshes) uses render group B.
(Available in v1.5 and above)
-Macro:
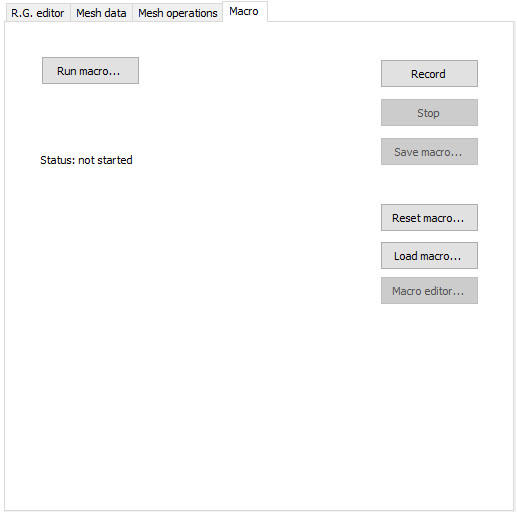
If you have several models that have the same meshes (with the same names), for example if you have several models of a character that have the same face, hair and skin meshes, but only the costume is different, the macro function can be very helpful.
This function records all the changes you make to the mesh(es), such as changing names, RG, textures, specular levels, etc. You can change any property multiple time or change the properties of several meshes at once (as before) without worry. The macro will record any change you make.
(Image from v1.7)
To use this function, go to "Macro" tab and click "Record" button. You should see "Status: Recording..." in red. To stop recording, return to this tab and click "Stop" button.
If you need to record more changes after you clicked "Stop", simply click "Record" and the macro will resume recording.
Make sure to save the macro to a macro file after recording because the macro will be reset if you load another model. Anyway, you will be prompted to save the current macro if you try to open a new model file, so don't worry.
To run a macro, open a model file, then go to "Macro" tab, click "Run macro" button and select a macro file. The macro will take only a moment to make the changes recorded in the macro file to the current model. When it is done, it will ask you if you want to keep the macro open for recording further changes.
To delete (clear) the current macro, click "Reset macro" button.
You can also load a macro ("Load macro" button). This function (available in v1.5) opens a macro file for use without "running" it, in other words, it doesn't apply the macro file to the current ascii file, it just loads it. This is useful if you wish to record changes and add them to the macro file even if it was recorded from another model file.
"Macro editor" (available in v1.7): it enables you to preview the contents of the current macro i.e. the changes the macro will make when applied to a model. You can also make changes to the parameters already recorded or even erase an item from the macro (Delete button). Simply select the item from the list, make any changes you want to it, then click "Save changes". To delete an item, select it, then click "Delete" button.

3. Commands menu:
(Available in v1.4 and above)1. Rearrange meshes: You can change the order of the meshes in the ascii file. As you may know, meshes are displayed in the meshes list in the same order as in the ascii file.
You can change their order however you like. First, go to "Commands" menu and activate "Rearrange meshes" option. To change the position of a mesh, use your mouse to drag and drop it to wherever you like; up or down the list. When you are done, deactivate "Rearrange meshes" option in "Commands" menu so that you don't move meshes by mistake.
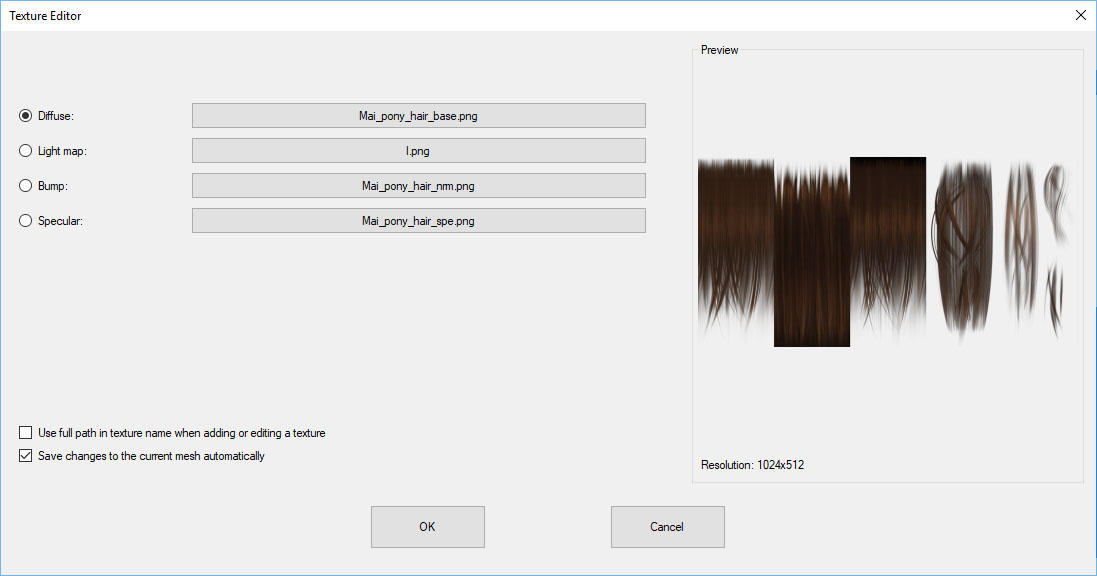
2. Texture editor: (available in v1.8 or later) this gives you an easy way to add/edit the current render group (material) textures without having to do anything manually. It also shows you a preview of the texture maps, select a texture to see a preview on the right.
To add/change a texture, click the related button and select a texture map file. When you are done, click OK to save your changes.
(Image from v1.9)
3. Reset: (available in v1.9 or later) this command resets the application to its initial state. In other words, it closes the current model and macro files, resets all variables and arrays, and clears old data from RAM.
Important notes:
1. All changes you make are not final. Meaning that they are not saved to the ascii model file until you save the file yourself from File -> Save As (Ctrl+S).2. You can search for a mesh or bone (depending on which tab is currently selected) using "Find" function. Go to File -> Find or press Ctrl+F
3. In "R.G Editor", if the "Select multiple meshes" box is selected, all changes made by "Change selected R.G." button will be made to the meshes selected in this list, not the mesh selected in main "Meshes" list on the left of the application's UI. So don't forget to turn this option off when you don't need it.
4. After you save the model file as ascii, you can either use "MeshAsciiToBin.exe" tool to create the .mesh file from the ascii so you can load the model in XPS via "Add model" window, or you can load the ascii file directly in XPS from "Modify" menu -> "Load Generic_Item", then you can save the model as .mesh or .xps
5. Yes, I know you can edit the ascii file in any text editor as Notepad, but in my humble opinion I think this tool is easier to use especially with a user interface.
6. If you don't like this tool or you think I'm an idiot, no problem at all, just don't use it. On the other hand, if you have any criticism or suggestion to improve a current function or even add new functions, I will be glad to hear it.
7. I don't know, I didn't think of anything to say here yet !
Download:
File name: XPS ASCII Editor.exe
File size: 380 KB
CRC32: 21F0A0AE
MD5: D0AF9535E38F66066B12BA43CC64590F
Virus scan: Virustotal
Special thanks to:
Change log:
v1.9
- Added: Reset command.
- Texture editor: Added the option to either save changes automatically or not.
- Texture editor: Check boxes for 'using full path' and 'saving changes' keep their values upon exit.
- Fixed: A bug in meshes with more than 1 UV layer which resulted in reverting UV layers of the current mesh to 1 when "Save changes" button was pressed.
- Fixed: An error when loading model with meshes lacking specular, map repeater or camera target values.
- Fixed: A bug where progress wasn't displayed correctly in the status bar while loading a model.
- Some improvements to the code and UI.
v1.8
- Added "Parenting bones" function. You can now link two or more bones without an external 3D editor.- Added "Texture editor".
v1.7
- Added support for XNALara/XPS template files (BoneDict). The tool can now create and use them.
- Added "Macro editor".
- Removed confirmation when saving changes to a bone.
- Fixed a bug where loading a model using drag & drop didn't enable "Load macro" button.
- Minor improvements to the code.
v1.6
- Added support for multiple UV layers.
- Added "Template editor" for renaming bones.
- Improved perception of template files used for renaming bones. Now you don't need to worry about your templates having unneeded spaces, blank lines, etc. The tool will fix everything for you automatically.
- Improved "Merge" function. You can now merge meshes with different UV layers.
- Several other improvements to the code.
v1.5
- Added Merge meshes function.
- Added "Load macro" function.
- Minor improvements to the code.
v1.4.4
- Fixed some bugs.
v1.4.3
- Added support for the new RG 26 and 27. The tool still supports the old versions of both of these RG.
- Added support for RG 34 and 35
v1.4.2
- Added support for render groups 42 and 43
- Minor UI improvement.
v1.4.1
- Fixed a bug where re-arranging meshes didn't update the "select multiple meshes" list.
v1.4
- Drag and drop function was added. You can now open files by dragging and dropping them into the tool.
- Re-arrange meshes function was added. Enable this option from "Commands" menu then use drag and drop to re-arrange the meshes.
- Prompt ask to save the current file before opening a new file.
- Ctrl+A can now be used to select all text in multi-line text boxes.
- Fixed a bug in searching bones where using search kept the current bone selected; adding to selection.
- Minor improvements to the code.
v1.3
- Added flip normals function.
- Minor improvements for more convenience.
v1.2
- Decreased loading time significantly. All models now take about 60-70% less time to load.
- The user interface is now responsive during model loading and shows the current progress in the status bar.
- Removed Delete bones button.
- Convert bone names function was added.
- Fixed some bugs.
v1.1.1
- Fixed some bugs
v1.1
- Added Bone rename function for multiple bones.
- Hide bones function now works on multiple bones.
v1.0
- Base release.
Join the community to add your comment. Already a deviant? Log In
XPS Pose converter [Tool]
4 min read
Since XPS models don't use the same bone names as there is no universal naming standards, ready poses don't work correctly on all models. Even the models ported by the same person sometimes have different bone names.
So I thought of creating a tool to edit the pose files so they can be used on models (carrying different bone names) other than the models with which the pose files were created.. and so, here it is:

Requirements:
- For Windows 8 users: nothing is needed. It should work right away.
- For Windows 7 and Vista: you need to install Microsoft .NET Framework 4.5:
www.microsoft.com/en-us/downlo…
How it works:
For the converter to work, it needs a "template", which tells the converter which bones to rename in the pose file; and their corresponding bones in the model.
You also need the pose file you want to convert (obviously!). You can use a template file, but it is not necessary.
Template format:
The template is composed of lines. The minimum is one line only.
The template format is as follows:
A=B
Where A and B are the corresponding bone names. They are the same bone, but the names are different.
Note: There should be no spaces between the "=" and either A or B. There also should be no empty lines in the template.
You don't have to have a template file, you can write a template yourself in "Template" tab; and even save it to a template file for later use.
The converter looks for A in the pose file and replaces it with B.
You can make the converter do the reverse; look for B and replace it with A by changing this option in the main window under "Conversion".
If you are confused or not sure whether you should use A -> B or B -> A, just check "Auto detect" option and forget about it. The converter will do the job.
Example:
This is a simple template that has only one line:
arm right finger 2a=Hand Right Index 1
Analysis:
A = "arm right finger 2a" (without the quotation marks)
B = "Hand Right Index 1" (without the quotation marks)
By default, the converter looks for "arm right finger 2a" bone in your pose file and renames it to "Hand Right Index 1" which is the name of the same bone in your model.
Typical usage:
1. Open your source pose file. (You can then revise/edit it in "Pose" tab).
2. Open the template file OR go to "Template" tab and create a template.
3. (Optional): Specify an output pose file. It is the converted pose file that will be written. If you don't, you need to go "Pose" tab after conversion and save the pose manually.
4. Select the conversion direction; from A to B, or from B to A. If you are confused or not sure, select "Auto detect" option. It's checked by default.
5. Click "Convert" button.
Creating or editing a template:
You can create a template easily in the converter itself. To create a new template, go to "Template" tab and write your template directly in the text box. To save the template, click "Save As" button and save it as a txt file.
However, put these in mind when you create a template:
1. Don't leave an empty line in the template.
2. Each line must contain the equals sign "="
3. Don't leave a space between the = sign and either A or B.
Note: The tool saves your preferences so you don't need to change them every time you use it.
I have included an example template for Dead or Alive 5 models (including Ultimate and Last Round) that converts between Kamson models and mine.
Template files are ordinary txt files, no fancy file extensions, so they should be easy to create and share.
If there are any bugs, please point them out. I'm also willing to hear any suggestions..
So I thought of creating a tool to edit the pose files so they can be used on models (carrying different bone names) other than the models with which the pose files were created.. and so, here it is:
XPS pose converter
XPS pose converter is a tool to change the names of bones in an XNALara/XPS pose file to match the bone names of the model you want to pose.
Requirements:
- For Windows 8 users: nothing is needed. It should work right away.
- For Windows 7 and Vista: you need to install Microsoft .NET Framework 4.5:
www.microsoft.com/en-us/downlo…
How it works:
For the converter to work, it needs a "template", which tells the converter which bones to rename in the pose file; and their corresponding bones in the model.
You also need the pose file you want to convert (obviously!). You can use a template file, but it is not necessary.
Template format:
The template is composed of lines. The minimum is one line only.
The template format is as follows:
A=B
Where A and B are the corresponding bone names. They are the same bone, but the names are different.
Note: There should be no spaces between the "=" and either A or B. There also should be no empty lines in the template.
You don't have to have a template file, you can write a template yourself in "Template" tab; and even save it to a template file for later use.
The converter looks for A in the pose file and replaces it with B.
You can make the converter do the reverse; look for B and replace it with A by changing this option in the main window under "Conversion".
If you are confused or not sure whether you should use A -> B or B -> A, just check "Auto detect" option and forget about it. The converter will do the job.
Example:
This is a simple template that has only one line:
arm right finger 2a=Hand Right Index 1
Analysis:
A = "arm right finger 2a" (without the quotation marks)
B = "Hand Right Index 1" (without the quotation marks)
By default, the converter looks for "arm right finger 2a" bone in your pose file and renames it to "Hand Right Index 1" which is the name of the same bone in your model.
Typical usage:
1. Open your source pose file. (You can then revise/edit it in "Pose" tab).
2. Open the template file OR go to "Template" tab and create a template.
3. (Optional): Specify an output pose file. It is the converted pose file that will be written. If you don't, you need to go "Pose" tab after conversion and save the pose manually.
4. Select the conversion direction; from A to B, or from B to A. If you are confused or not sure, select "Auto detect" option. It's checked by default.
5. Click "Convert" button.
Creating or editing a template:
You can create a template easily in the converter itself. To create a new template, go to "Template" tab and write your template directly in the text box. To save the template, click "Save As" button and save it as a txt file.
However, put these in mind when you create a template:
1. Don't leave an empty line in the template.
2. Each line must contain the equals sign "="
3. Don't leave a space between the = sign and either A or B.
Note: The tool saves your preferences so you don't need to change them every time you use it.
Download:
mega.nz/#!p9YwlRhJ!QRH9Emjx5DQ…I have included an example template for Dead or Alive 5 models (including Ultimate and Last Round) that converts between Kamson models and mine.
Template files are ordinary txt files, no fancy file extensions, so they should be easy to create and share.
If there are any bugs, please point them out. I'm also willing to hear any suggestions..
Join the community to add your comment. Already a deviant? Log In
Christmas gift (2014)
5 min read
Hello everybody 
I have been working for a while preparing a Christmas gift, I kept it secret (well, sort of) as I didn't want to announce it until I'm done
My gift is 12 DoA5 Santa models, here they are:
1. Brad Wong

2. Eliot

3. Helena

4. Momiji

5. Mila

6. Rachel

7. Rig

8. Ryu Hayabusa

9. Hayate

10.Marie Rose

11.Hitomi

12.Christie

I'm not a Christian and I don't care much about DoA5 Santa models, but I thought it would be nice to make this special gift for you guys and wish you all a merry Christmas and a happy new year
I spent a lot of time and exerted a lot of effort into making it..
I hope you like it
I have been working for a while preparing a Christmas gift, I kept it secret (well, sort of) as I didn't want to announce it until I'm done
My gift is 12 DoA5 Santa models, here they are:
1. Brad Wong

2. Eliot

3. Helena

4. Momiji

5. Mila

6. Rachel

7. Rig

8. Ryu Hayabusa

9. Hayate

10.Marie Rose

11.Hitomi

12.Christie

I'm not a Christian and I don't care much about DoA5 Santa models, but I thought it would be nice to make this special gift for you guys and wish you all a merry Christmas and a happy new year
I spent a lot of time and exerted a lot of effort into making it..
I hope you like it
Join the community to add your comment. Already a deviant? Log In
Support
My Work
Browse My Shop